Kia Soul (SK3): Engine coolant / Checking the coolant level
WARNING
Removing radiator cap

- Never attempt to remove the radiator cap while the engine is operating or hot. Doing so might lead to cooling system and engine damage and could result in serious personal injury from escaping hot coolant or steam.
- Turn the engine off and wait until it cools down. Use extreme care when removing the radiator cap. Wrap a thick towel around it, and turn it counterclockwise slowly to the first stop. Step back while the pressure is released from the cooling system. When you are sure all the pressure has been released, press down on the cap, using a thick towel, and continue turning counterclockwise to remove it.
- Even if the engine is not operating, do not remove the radiator cap or the drain plug while the engine and radiator are hot. Hot coolant and steam may still blow out under pressure, causing serious injury.
WARNING
The electric motor (cooling fan) is controlled by engine coolant temperature, refrigerant pressure and vehicle speed. It may sometimes operate even when the engine is not running. Use extreme caution when working near the blades of the cooling fan so that you are not injured by a rotating fan blades. As the engine coolant temperature decreases, the electric motor will automatically shut off. This is a normal condition.
If your vehicle is equipped with GDI, the electric motor (cooling fan) may operate until you disconnect the negative battery cable.
Check the condition and connections of all cooling system hoses and heater hoses. Replace any swollen or deteriorated hoses.
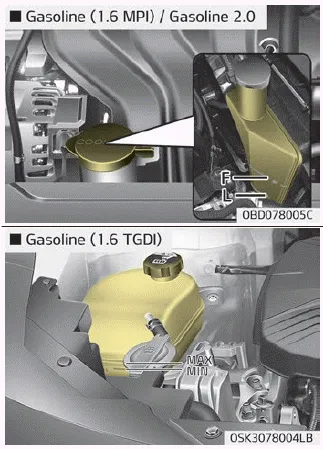
The coolant level should be filled between F (MAX) and L (MIN) marks on the side of the coolant reservoir when the engine is cool.
If the coolant level is low, add enough distilled (deionized) water. Bring the level to F (MAX), but do not overfill. If frequent additions are required, have the system inspected by a professional workshop. Kia recommends to visit an authorized Kia dealer/service partner.
Recommended engine coolant
- When adding coolant, use only deionized water or soft water for your vehicle and never mix hard water in the coolant filled at the factory. An improper coolant mixture can result in serious malfunction or engine damage.
- The engine in your vehicle has aluminum engine parts and must de protected by an ethylene-glycol with phosphate based coolant to prevent corrosion and freezing.
- DO NOT USE alcohol or methanol coolant or mix them with the specified coolant.
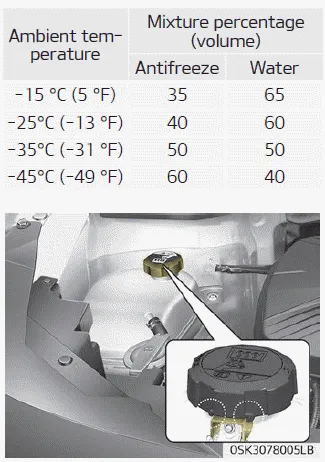
- Do not use a solution that contains more than 60% antifreeze or less than 35% antifreeze, which would reduce the effectiveness of the solution.
For mixture percentage, refer to the following table.
WARNING
Removing radiator cap

Do not remove the radiator cap when the engine and radiator are hot. Scalding hot coolant and steam may blow out under pressure causing serious injury.
Changing the coolant
Have the coolant replaced by a professional workshop. Kia recommends to visit an authorized Kia dealer/service partner.
CAUTION
Put a thick cloth or fabric around the radiator cap before refilling the coolant in order to prevent the coolant from overflowing into engine parts such as generator.
WARNING
Coolant
- Do not use radiator coolant or antifreeze in the washer fluid reservoir.
- Radiator coolant can severely obscure visibility when sprayed on the windshield and may cause loss of vehicle control or damage to paint and body trim.
The high-pressure cooling system has a reservoir filled with year-round antifreeze coolant. The reservoir is filled at the factory. Check the antifreeze protection and coolant concentration level at least once a year, at the beginning of the winter season, and before traveling to a colder climate.
Other information:
Kia Soul (SK3) 2020-2025 Owners Manual: Wiper blades
Blade inspection NOTICE Commercial hot waxes applied by automatic car washes have been known to make the windshield difficult to clean. Contamination of either the windshield or the wiper blades with foreign matter can reduce the effectiveness of the windshield wipers.
Kia Soul (SK3) 2020-2025 Owners Manual: Tires and wheels
CAUTION When replacing tires, use the same size originally supplied with the vehicle. Using tires of a different size can damage the related parts or make it work irregularly. NOTICE We recommend that when replacing tires, use the same originally supplied with the vehicles.
Categories
- Manuals Home
- Kia Soul Owners Manual
- Seat belt warning
- Emergency commodity
- Safety features of your vehicle
- New on site
- Most important about car