Kia Soul (SK3): Specifications & Consumer information / Recommended lubricants and capacities
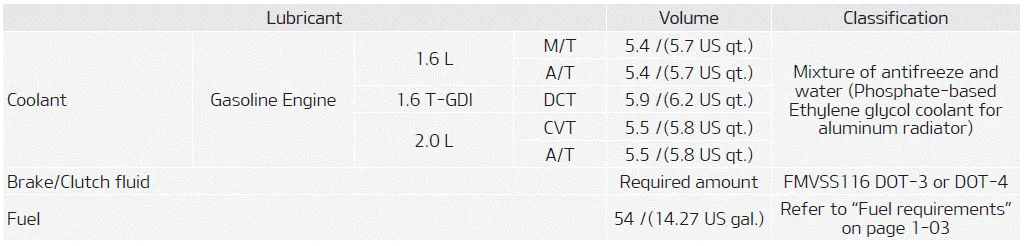
To help achieve proper engine and powertrain performance and durability, use only lubricants of the proper quality. The correct lubricants also help promote engine efficiency that results in improved fuel economy. These lubricants and fluids are recommended for use in your vehicle.

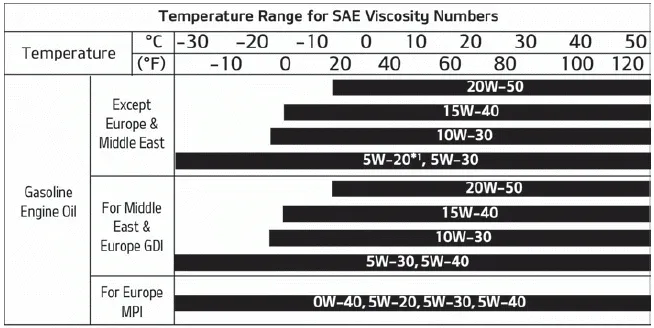
Recommended SAE viscosity number
CAUTION
Always be sure to clean the area around any filler plug, drain plug, or dipstick before checking or draining any lubricant. This is especially important in dusty or sandy areas and when the vehicle is used on unpaved roads. Cleaning the plug and dipstick areas will prevent dirt and grit from entering the engine and other mechanisms that could be damaged.
Engine oil viscosity (thickness) has an effect on fuel economy and cold weather operating (engine start and engine oil flowability). Lower viscosity engine oils can provide better fuel economy and cold weather performance, however, higher viscosity engine oils are required for satisfactory lubrication in hot weather.
Using oils of any viscosity other than those recommended could result in engine damage.
When choosing an oil, consider the range of temperature your vehicle will be operated in before the next oil change. Proceed to select the recommended oil viscosity from the chart.
CAUTION When replacing tires, use the same size originally supplied with the vehicle. Using tires of a different size can damage the related parts or make it work irregularly.
Vehicle identification number (VIN) The vehicle identification number (VIN) is the number used in registering your vehicle and in all legal matters pertaining to its ownership, etc.
Other information:
Kia Soul (SK3) 2020-2025 Owners Manual: Inner panel fuse replacement
1. Turn the ignition switch and all other switches off. 2. Open the fuse panel cover. 3. Pull the suspected fuse straight out. Use the removal tool provided in the main fuse box in the engine compartment. 4. Check the removed fuse; replace it if it is blown.
Kia Soul (SK3) 2020-2025 Owners Manual: Vanity mirror lamp bulb replacement
WARNING Prior to working on the Interior lamps, ensure that the “OFF” button is depressed to avoid burning your fingers or receiving an electric shock. 1. Using a flat-blade screwdriver, gently pry the lamp assembly from interior. 2. Remove the bulb by pulling it straight out.
Categories
- Manuals Home
- Kia Soul Owners Manual
- Introduction
- Scheduled maintenance service
- Features of your vehicle
- New on site
- Most important about car
