Kia Soul (SK3): Air bag - supplemental restraint system / Curtain air bag
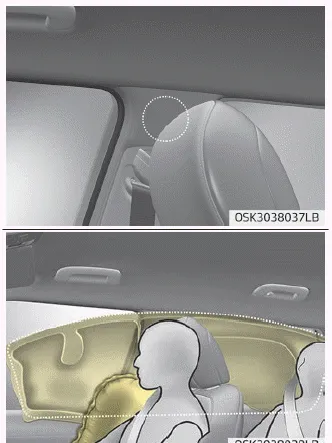
❈ The actual air bags in the vehicle may differ from the illustration. Curtain air bags are located along both sides of the roof rails above the front and rear doors.
They are designed to help protect the heads of the front seat occupants and the rear outboard seat occupants in certain side impact collisions.
The curtain air bags are designed to deploy during certain side impact collisions, depending on the crash severity, angle, speed and point of impact. The curtain air bags are not designed to deploy in all side impact situations, collisions from the front or rear of the vehicle or in most rollover situations.
WARNING
- Do not hang heavy items on the coat hooks for safety reasons.
- In order for side and curtain air bags to provide the best protection, both front seat occupants and both outboard rear occupants should sit in an upright position with the seat belts properly fastened. Importantly, children should sit in a proper child restraint system in the rear seat.
- When children are seated in the rear outboard seats, they must be seated in the proper child restraint system. Make sure to put the child restraint system as far away from the door side as possible, and secure the child restraint system in a locked position.
- Do not allow the passengers to lean their heads or bodies onto doors, put their arms on the doors, stretch their arms out of the window, or place objects between the doors and passengers when they are seated on seats equipped with side and/or curtain air bags.
- Never try to open or repair any components of the curtain air bag system. If necessary, have the system serviced by a professional workshop. Kia recommends to visit an authorized Kia dealer/service partner.
Failure to follow the above mentioned instructions can result in injury or death to the vehicle occupants in an accident.
WARNING
No attaching objects
• Do not place any objects over the air bag. Also, do not attach any objects around the area the air bag inflates such as the door, side door glass, front and rear pillar, roof side rail.
• Do not hang hard or breakable objects on the clothes hanger.
❈ The actual air bags in the vehicle may differ from the illustration. Your vehicle is equipped with a side air bag in each front seat. The purpose of the air bag is to provide the vehicle's driver and/or the front passenger with additional protection than that offered by the seat belt alone.
There are many types of accidents in which the air bag would not be expected to provide additional protection. These include rear impacts, second or third collisions in multiple impact accidents, as well as low speed impacts.
Other information:
Kia Soul (SK3) 2020-2025 Owners Manual: Explanation of scheduled maintenance items
Engine oil and filter The engine oil and filter should be changed at the intervals specified in the maintenance schedule. If the car is being driven in severe conditions, more frequent oil and filter changes are required. Drive belts Inspect all drive belts for evidence of cuts, cracks, excessive wear or oil saturation and replace if neces
Kia Soul (SK3) 2020-2025 Owners Manual: Bulb replacement precaution
Please prepare bulbs with appropriate standards in case of emergencies (Refer to “Bulb wattage” on page 9-07 for further information). When changing bulbs and sorts, first turn off the engine at a safe place, firmly apply the side brake and take out the battery's negative (-) terminal.
Categories
- Manuals Home
- Kia Soul Owners Manual
- Trip information (trip computer)
- Rear seat adjustment
- Cruise control system
- New on site
- Most important about car
