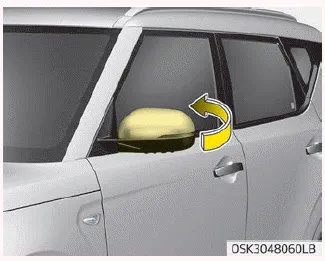
Kia Soul (SK3): Features of your vehicle / Mirrors. Outside rearview mirror. Folding the outside rearview mirror
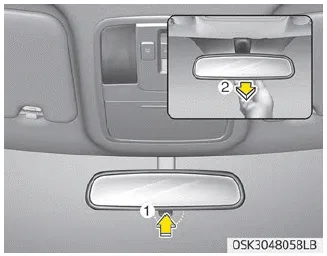
Inside rearview mirror
Adjust the rearview mirror so that the center view through the rear window is seen. Make this adjustment before you start driving.
WARNING
Rear visibility
Do not place objects in the rear seat or cargo area which would interfere with your vision out the rear window.
WARNING
Do not adjust the rearview mirror while the vehicle is moving. This could result in loss of control, and an accident which could cause death, serious injury or property damage.
WARNING
Do not modify the inside mirror and don’t install a wide mirror. It could result in injury, during an accident or deployment of the air bag.
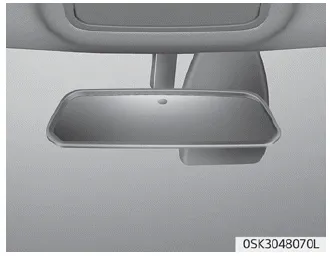
Day/night rearview mirror (if equipped)
Make this adjustment before you start driving and while the day/night lever is in the day position(1).
Pull the day/night lever toward you to reduce the glare from the headlights of the vehicles behind you during night driving.
Remember that you lose some rearview clarity in the night position.
❈ (1) : Day, (2) : Night
Electrochromic mirror (ECM)
The electric rearview mirror automatically controls the glare from the headlamp of the car behind you in nighttime or low light driving conditions.
When the engine is running, the glare is automatically controlled by the sensor mounted in the rearview mirror. The sensor detects the light level around the vehicle, and automatically adjusts to control the headlamp glare from vehicles behind you.
Whenever the shift lever is placed in R (Reverse), the mirror will automatically go to the brightest setting in order to improve the drivers view behind the vehicle.
NOTICE
When cleaning the mirror, use a paper towel or similar material dampened with glass cleaner. Do not spray glass cleaner directly on the mirror as that may cause the liquid cleaner to enter the mirror housing.
CAUTION
When cleaning the mirror, use a paper towel or similar material dampened with glass cleaner. Do not spray glass cleaner directly on the mirror. It may cause the liquid cleaner to enter the mirror housing.
Outside rearview mirror. Folding the outside rearview mirror
Be sure to adjust the mirror angles before driving.
Your vehicle is equipped with both lefthand and right-hand outside rearview mirrors. The mirrors can be adjusted remotely with the remote switch. The mirror heads can be folded back to prevent damage during an automatic car wash or when passing through a narrow street.
WARNING
Rearview mirrors
- The outside rearview mirror is convex. Objects seen in the mirror are closer than they appear.
- Use your interior rearview mirror or direct observation to determine the actual distance of following vehicles when changing lanes.
CAUTION
Do not scrape ice off the mirror face; this may damage the surface of the glass. If ice should restrict the movement of the mirror, do not force the mirror for adjustment. To remove ice, use a deicer spray, or a sponge or soft cloth with warm water.
CAUTION
If the mirror is jammed with ice, do not adjust the mirror by force. Use an approved spray de-icer (not radiator antifreeze) to release the frozen mechanism or move the vehicle to a warm place and allow the ice to melt.
WARNING
Do not adjust or fold the outside rearview mirrors while the vehicle is moving. This could result in loss of control, and an accident which could cause death, serious injury or property damage.
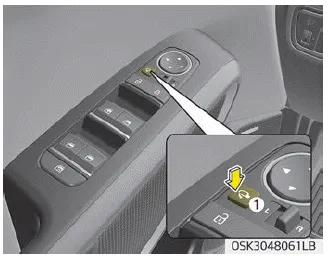
Remote control

The electric remote control mirror switch allows you to adjust the position of the left and right outside rearview mirrors. To adjust the position of either mirror,move the R or L switch(1) to select the right side mirror or the left side mirror, then press a corresponding point ( ) on the mirror adjustment control (2) to position the selected mirror up, down, left or right.
CAUTION
- The mirrors stop moving when they reach the maximum adjusting angles, but the motor continues to operate while the switch is pressed. Do not press the switch longer than necessary, the motor may be damaged.
- Do not attempt to adjust the outside rearview mirror by hand. Doing so may damage the parts.
Folding the outside rearview mirror
Manual type
To fold the outside rearview mirror, grasp the housing of the mirror and then fold it toward the rear of the vehicle.
Electric type
To fold the outside rearview mirror depress the button (1).
To unfold it, depress the button (1) again.
- With folding & smart key
- The mirror will fold or unfold when the door is locked or unlocked by the smart key. (if equipped) - With smart key
- The mirror will fold or unfold when the door is locked or unlocked by the button on the outside door handle. (if equipped)
- The mirror will unfold when you approach the vehicle (all doors closed and locked) with a smart key in possession. (if equipped) This function works when “On driver approach” is selected in User settings in the cluster.
CAUTION
The electric type outside rearview mirror operates even though the ignition switch is in the LOCK or OFF position. However, to prevent unnecessary battery discharge, do not adjust the mirrors longer than necessary while the engine is not running.
CAUTION
In case it is an electric type outside rearview mirror, don’t fold it by hand. It could cause motor failure.
To sound the horn, press the area indicated by the horn symbol on your steering wheel (see illustration). The horn will operate only when this area is pressed.
1. Tachometer 2. Speedometer 3. Engine coolant temperature gauge 4. Fuel gauge 5. Warning and indicator lights 6. LCD display Instrument cluster control Adjusting instrument cluster illumination WARNING Never adjust the instrument cluster while driving.
Other information:
Kia Soul (SK3) 2020-2025 Owners Manual: Distributing the sealant
11. Immediately drive approximately 7~10 km (4~6 miles or, about 10min) to evenly distribute the sealant in the tire. CAUTION Do not exceed a speed of 80 km/h (50 mph). If possible, do not fall below a speed of 20 km/h (12 mph). While driving, if you experience any unusual vibration, ride disturbance or noise, reduce your speed and drive wi
Kia Soul (SK3) 2020-2025 Owners Manual: Position lamp/DRL/Front turn signal lamp bulb replacement (Type A, B)
1. Open the hood. 2. Remove the bulb socket-connector by turning it counterclockwise. 3. Remove the bulb from the lamp assembly. 4. Install a new bulb. 5. Connect the bulb socket-connector. Headlamp bulb WARNING Halogen bulbs Halogen bulbs contain pressurized gas that will produce flying pieces of glass if broken.
Categories
- Manuals Home
- Kia Soul Owners Manual
- Rear seat adjustment
- Drive mode integrated control system
- Maintenance
- New on site
- Most important about car
