Kia Soul: ISOFIX anchorage and top-tether anchorage for children / Suitability of each seating position for belted & ISOFIX Child Restraint Systems according to UN regulations (Except Europe)
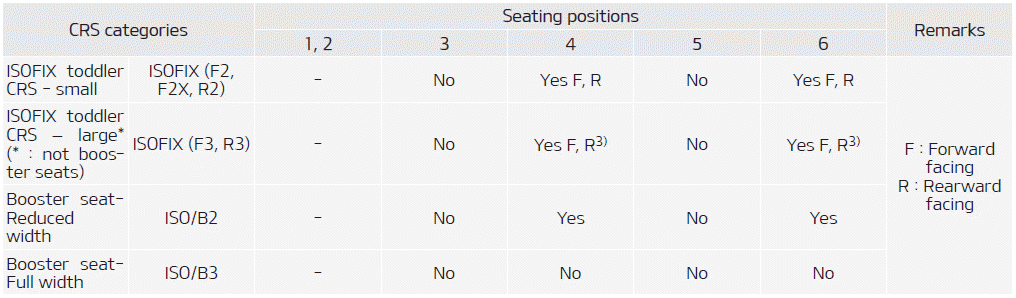
Kia Soul (SK3) 2020-2025 Owners Manual / Safety features of your vehicle / Child restraint system (CRS) / ISOFIX anchorage and top-tether anchorage for children / Suitability of each seating position for belted & ISOFIX Child Restraint Systems
according to UN regulations (Except Europe)
(Information for vehicle users and CRS manufacturers)
- Yes : Suitable for fitment of the designated category of CRS
- No : Not suitable for fitment of the designated category of CRS
- “-” : Not applicable
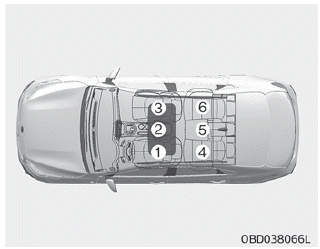
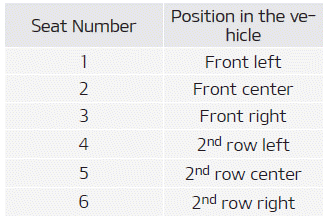
- The table is based on LHD vehicle. Except for the front passenger seat, the table is valid for RHD vehicle. For RHD vehicle front passenger seat, please use information for the seating position number 3.
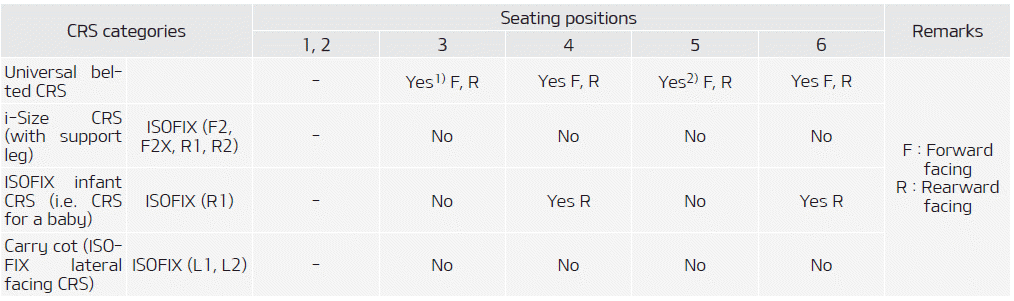
Note1) : Should be adjusted seatback and (or) seat pumping (if equipped) properly.
Note2) : The seating position (number 5) is not suitable for fitment of child restraint system with support leg.
Note3) : For fitment of ISOFIX toddler’s rearward facing large CRS
- Driver’s seat : Seat pumping should be adjusted to appropriate height.
- Front passenger seat : Seat sliding should be adjusted to appropriate position.
❈ Never place a rearward facing Child Restraint System on the front passenger seat, unless the passenger air bag is deactivated.
❈ It is recommended to remove the head restraint, when CRS is unstable due to head restraint
 Suitability of each seating position for belted & ISOFIX Child Restraint Systems
according to UN regulations
Suitability of each seating position for belted & ISOFIX Child Restraint Systems
according to UN regulations
Yes : Suitable for fitment of the designated category of CRS No : Not suitable for fitment of the designated category of CRS “-” : Not applicable The table is based on LHD vehicle. Except for the ...
 Air bag - supplemental restraint system
1. Driver’s front air bag 2. Passenger’s front air bag* 3. Side air bag* 4. Curtain air bag* 5. Passenger’s front air bag ON/OFF switch* WARNING Even in vehicles with air bags, you and your passengers ...
Other information:
Kia Soul (SK3) 2020-2025 Owners Manual: BCW (Blind-Spot Collision Warning) (if equipped)
Operating conditions The indicator on the switch will illuminate when the BCW button is pressed with the engine start/stop button ON. If the vehicle speed exceeds 30 km/h (18.6 mph), the system will activate. If you press the button again, the switch indicator and system will be turned off. If the engine ...
Kia Soul (SK3) 2020-2025 Owners Manual: Instrument cluster control
Adjusting instrument cluster illumination WARNING Never adjust the instrument cluster while driving. This could result in loss of control and lead to an accident that may cause death, serious injury, or property damage. The brightness of the instrument panel illumination is changed by pressing the illumination ...
Copyright © www.ksoulsk3.com 2020-2025
