Kia Soul (SK3): Seat / Front seat adjustment - power
The driver’s seat can be adjusted by using the control switches located on the outside of the seat cushion. Before driving, adjust the seat to the proper position so as to easily control the steering wheel, pedals and switches on the instrument panel.
WARNING
The power seat is operable with the ignition OFF.
Therefore, children should never be left unattended in the car.
CAUTION
- The power seat is driven by an electric motor. Stop operating once the adjustment is completed. Excessive operation may damage the electrical equipment.
- When in operation, the power seat consumes a large amount of electrical power. To prevent unnecessary charging system drain, don’t adjust the power seat longer than necessary while the engine is not running.
- Do not operate two or more power seat control switches at the same time. Doing so may result in power seat motor or electrical component malfunction.
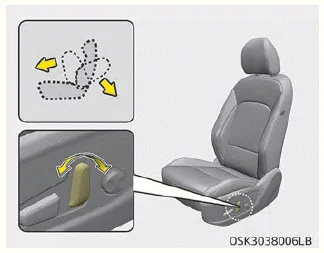
Forward and rearward, Seatback angle
Forward and rearward

1. Push the control switch forward or rearward to move the seat to the desired position.
2. Release the switch once the seat reaches the desired position.
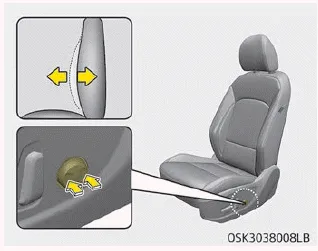
Seatback angle
1. Push the control switch forward or rearward to move the seatback to the desired angle.
2. Release the switch once the seat reaches the desired position.
Seat cushion height. Lumbar support
Seat cushion height
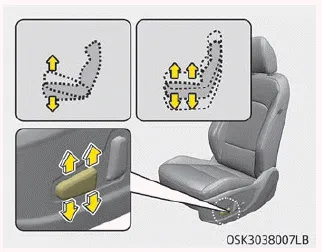
1. Pull the front portion of the control switch up to raise or press down to lower the front part of the seat cushion. Pull the rear portion of the control switch up to raise or press down to lower the seat cushion.
2. Release the switch once the seat reaches the desired position.
Lumbar support
The lumbar support can be adjusted by pressing the lumbar support switch on the side of the seat.
1. Press the front portion of the switch to increase support, or the rear portion of the switch, to decrease support.
2. Release the switch once it reaches the desired position.
Forward and backward To move the seat forward or backward: 1. Pull the seat slide adjustment lever up and hold it. 2. Slide the seat to the position you desire.
The driver's and front passenger's seats are equipped with a headrest for the occupant's safety and comfort. The headrest not only provides comfort for the driver and front passenger, but also helps protect the head and neck in the event of a collision.
Other information:
Kia Soul (SK3) 2020-2025 Owners Manual: Check tire pressure
You can check the tire pressure in the assist mode on the cluster. - Refer to “LCD mode” on page 4-54. Tire pressure is displayed 1~2 minutes later after driving. If tire pressure is not displayed when the vehicle is stopped, “Drive to display” message displays.
Kia Soul (SK3) 2020-2025 Owners Manual: Map lamp (LED type) bulb replacement
If the map lamp (LED) (1), does not operate, have your vehicle checked by a professional workshop. Kia recommends to visit an authorized Kia dealer/service partner. The LED lamps cannot be replaced as a single unit because it is an integrated unit.
Categories
- Manuals Home
- Kia Soul Owners Manual
- Driving your vehicle
- Battery replacement
- Mirrors. Outside rearview mirror. Folding the outside rearview mirror
- New on site
- Most important about car
