Kia Soul (SK3): Light bulbs / Headlamp and front fog lamp aiming
Headlamp aiming

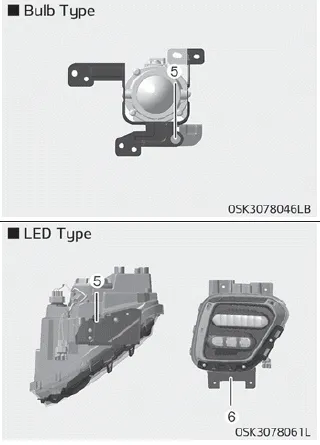
Front fog lamp aiming
1. Horizontal aiming
2. Vertical aiming
3. Low vertical aiming
4. High vertical aiming
5. Vertical aiming (Front)
6. Vertical aiming (Low)
1. Inflate the tires to the specified pressure and remove any loads from the vehicle except the driver, spare tire, and tools.
2. The vehicle should be placed on a flat floor.
3. Draw vertical lines (Vertical lines passing through respective head lamp centers) and a horizontal line (Horizontal line passing through center of head lamps) on the screen.
4. With the head lamp and battery in normal condition, aim the head lamps so the brightest portion falls on the horizontal and vertical lines.
5. To aim the low and high beams left or right, turn the driver (1) clockwise or counterclockwise. To aim the low and high beams up or down, turn the driver (2) clockwise or counterclockwise.
1. Using a flat-blade screwdriver, gently pry the lens cover from lamp housing. 2. Remove the bulb by pulling it straight out. 3. Install a new bulb in the socket.
To aim the front fog lamp up or down, turn the driver clockwise or counterclockwise. Aiming point (Headlamp type A) Aiming point (Headlamp type B) Aiming point (Headlamp type C) Head lamp low beam (LHD Vehicle) 1.
Other information:
Kia Soul (SK3) 2020-2025 Owners Manual: Checking the tire inflation pressure
1. After driving approximately 7~10 km ( 4~6 miles or about 10 minutes), stop at a suitable location. 2. Connect connection hose (10) of the compressor directly to the tire valve. 3. Connect between compressor and the vehicle power outlet using the cable and connectors.
Kia Soul (SK3) 2020-2025 Owners Manual: Light bulb position (Rear)
1. Tail lamp (Bulb type) 2. Tail and stop lamp (Bulb type) 3. Rear turn signal lamp (Bulb type) 4. Back-up lamp (Bulb type) 5. Tail lamp (LED type) 6. Stop lamp (LED type) 7. License plate lamp (Bulb type) 8. High mounted stop lamp (Bulb or LED type) 9.
Categories
- Manuals Home
- Kia Soul Owners Manual
- Defroster
- Safety features of your vehicle
- Specifications & Consumer information
- New on site
- Most important about car
